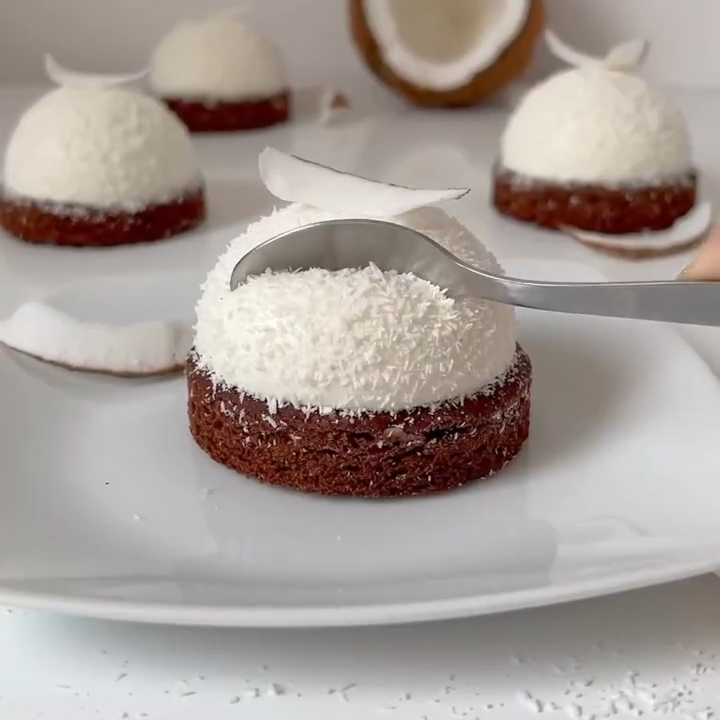
If you’re looking for a dessert that’s not only irresistibly delicious but also visually stunning, the Coconut Dome with Chocolate Spread is your answer. Imagine a smooth and creamy coconut mousse shaped into a perfect dome, hiding a luscious center of velvety chocolate spread, all finished with a mirror glaze or shredded coconut.
This no-bake dessert is inspired by the elegant French entremets but made simple enough for home bakers. It’s refreshing, sweet, and offers a delightful contrast of textures—airy coconut mousse, rich chocolate, and a soft biscuit or sponge base. Whether you’re hosting a dinner party, preparing for the holidays, or just craving something special, this dessert is guaranteed to impress.
Why You’ll Love This Recipe
✅ Elegant and restaurant-worthy presentation
✅ Perfect make-ahead dessert
✅ Naturally gluten-free (when using a GF base)
✅ Balanced flavor – creamy, chocolaty, and coconutty
✅ Easily adaptable to personal tastes
Recommended Kitchen Tools
To create the perfect Coconut Dome, you’ll need:
- Silicone dome molds
- Mixing bowls
- Electric mixer or hand whisk
- Rubber spatula
- Saucepan
- Whisk
- Ice cream scoop or spoon
- Piping bag (optional)
- Baking sheet lined with parchment (for bases)
- Freezer-safe containers
Ingredients
For the Coconut Mousse:
- 1 ½ cups (360 ml) coconut milk (full-fat)
- 1 cup (240 ml) heavy cream (cold)
- ⅓ cup (40 g) powdered sugar (adjust to taste)
- 2 tsp unflavored gelatin (or agar-agar for vegetarian version)
- 2 tbsp cold water (for blooming gelatin)
- ½ tsp vanilla extract
- ½ cup shredded coconut (optional, for texture)
For the Chocolate Center:
- ½ cup (120 g) chocolate spread (Nutella or similar)
- Optional: chopped hazelnuts for crunch
For the Base:
- 6–8 round biscuit or sponge cake discs (3 inches in diameter)
- Store-bought or homemade
For the Coating (Choose One):
- Shredded coconut (for a rustic look)
- White chocolate mirror glaze (for a glossy finish)
- Cocoa powder and desiccated coconut mix
Preparation Instructions
Step 1: Prepare the Chocolate Centers
- Scoop about 1 teaspoon of chocolate spread into small mounds on a parchment-lined tray.
- Freeze for at least 30 minutes to firm them up. This helps embed them neatly into the mousse.
Step 2: Make the Coconut Mousse
- Bloom the gelatin by sprinkling it over cold water. Let sit for 5 minutes.
- Warm half of the coconut milk in a saucepan. Stir in the bloomed gelatin until fully dissolved.
- Add the remaining coconut milk, vanilla extract, and powdered sugar. Let the mixture cool.
- In a separate bowl, whip the heavy cream to soft peaks.
- Gently fold the whipped cream into the cooled coconut mixture.
- Optional: Fold in shredded coconut for extra texture.
Step 3: Fill the Dome Molds
- Spoon or pipe coconut mousse into each silicone dome mold, filling halfway.
- Add a frozen chocolate center to the middle.
- Top with more mousse to cover completely.
- Lightly tap the molds to remove air bubbles.
- Freeze the domes for at least 6 hours or until completely firm.
Step 4: Add the Base
- Once domes are firm, press a biscuit or cake base onto each dome.
- Return to the freezer for at least 1 hour to set everything together.
Step 5: Unmold and Decorate
- Gently unmold the domes.
- Immediately roll in shredded coconut or glaze with a mirror glaze.
- Garnish with a dollop of whipped cream, toasted coconut, or a drizzle of melted chocolate if desired.
Tips for Success
- ✅ Use high-quality coconut milk: Full-fat coconut milk creates a rich, creamy mousse. Avoid low-fat versions.
- ✅ Chill your tools: Cold bowls and beaters help whip cream better.
- ✅ Freeze thoroughly: For perfect unmolding, ensure the domes are completely frozen.
- ✅ Smooth molds = smooth domes: Silicone dome molds make removal clean and easy.
- ✅ Don’t overmix the mousse: Folding gently keeps the texture airy and light.
Recipe Variations
🥭 Tropical Twist:
Add a center of mango purée or passion fruit curd instead of chocolate for a fruity take.
🍫 Double Chocolate:
Swap the coconut mousse for white chocolate mousse and fill with dark chocolate ganache.
🥜 Nutty Delight:
Add crushed almonds or hazelnuts between the layers or in the mousse itself.
🍓 Berry Coconut Domes:
Mix raspberry purée into the mousse and add a berry compote center.
Make It Fit Your Diet
- Vegetarian: Use agar-agar instead of gelatin.
- Gluten-Free: Choose a GF biscuit or base (like almond flour sponge).
- Dairy-Free: Use coconut cream instead of heavy cream for a fully dairy-free mousse.
- Low-Sugar: Reduce sugar and use sugar-free chocolate spread.
Storage and Serving
- Store in Freezer: Up to 1 month, in an airtight container.
- Thaw in Fridge: For about 1 hour before serving for the perfect texture.
- Serve Chilled: These domes are best slightly cold for a mousse-like experience.
Frequently Asked Questions
Can I make these domes in advance?
Yes! You can make and freeze them up to a month in advance. Decorate just before serving.
Can I skip the chocolate center?
Absolutely. You can fill with jam, caramel, or keep it plain coconut mousse.
What if I don’t have dome molds?
Use silicone muffin cups or ramekins. The shape will be different, but the taste will be divine!
Final Thoughts
The Coconut Dome with Chocolate Spread isn’t just a dessert—it’s an experience. From the moment you slice into the creamy dome to reveal the rich chocolate heart, to the last luxurious spoonful, it’s pure indulgence. This elegant treat is ideal for birthdays, celebrations, holidays, or when you simply want to spoil yourself with something beautiful and delicious.
Whether you’re an experienced home baker or trying entremet-style desserts for the first time, this recipe is approachable, versatile, and rewarding. Plus, it’s a guaranteed conversation starter at any table.