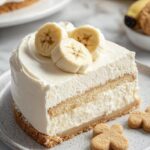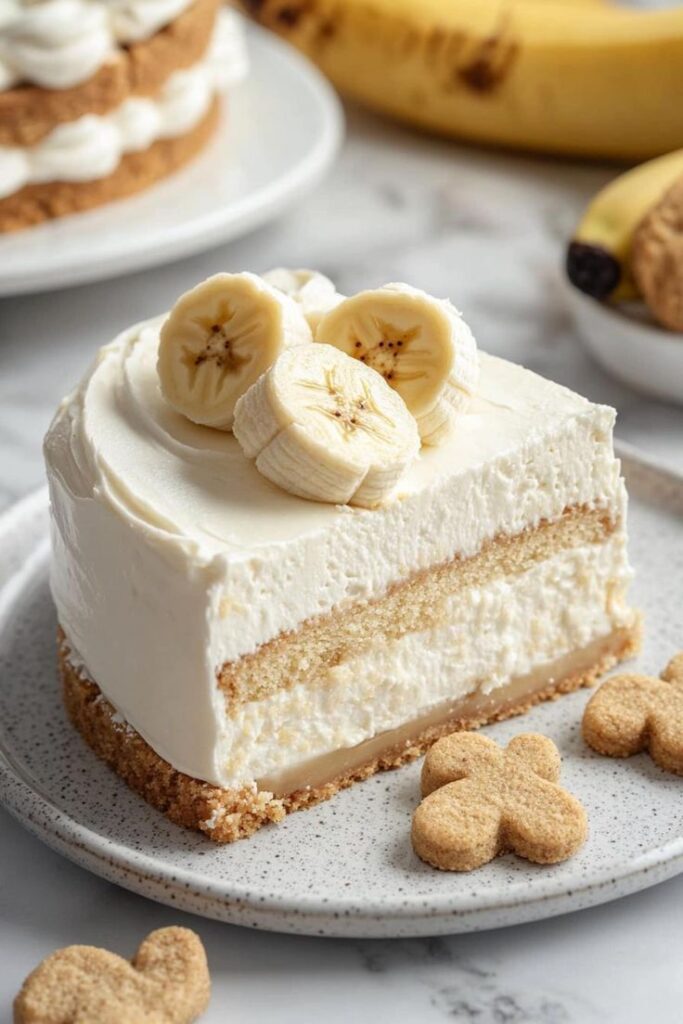
If you’re a fan of banana pudding and cheesecake, get ready for the ultimate dessert mashup: Banana Pudding Crunch Cheesecake. This indulgent treat combines the nostalgic comfort of banana pudding with the rich, creamy texture of cheesecake and a buttery Nilla wafer crunch. It’s everything you love about both classic desserts layered into one unforgettable experience.
Banana pudding has long been a Southern staple, adored for its sweet bananas, creamy vanilla pudding, and crisp cookies. Meanwhile, cheesecake is celebrated for its decadent, silky filling and crumbly crust. The genius of this recipe lies in marrying the two — creating a luscious, no-holds-barred dessert that’s perfect for holidays, potlucks, or special family dinners.
This recipe is surprisingly easy to make at home, with a few make-ahead steps and layers of deliciousness. From the Nilla wafer crust and banana-studded cheesecake layer to the pudding topping and crunchy bits, every bite is pure bliss.
Recommended Kitchen Tools
To make your Banana Pudding Crunch Cheesecake turn out perfect every time, it helps to have the following kitchen tools on hand:
- 9-inch Springform Pan – Essential for baking cheesecakes and releasing them cleanly.
- Mixing Bowls – You’ll need several for the crust, filling, and pudding layers.
- Hand Mixer or Stand Mixer – For beating the cream cheese and whipping the topping.
- Spatula – For folding ingredients and spreading layers evenly.
- Measuring Cups & Spoons – Accuracy is key in dessert-making.
- Food Processor or Rolling Pin – To crush Nilla wafers for the crust and topping.
- Oven and Refrigerator – You’ll bake the cheesecake layer and chill the rest.
- Piping Bag (optional) – For decorative whipped cream topping, if desired.
- Knife and Offset Spatula – For smoothing and clean slicing.
Having the right tools makes assembly smooth and helps achieve a bakery-quality finish.
Ingredients
This recipe features multiple layers, so we’ll break the ingredients into four parts: crust, cheesecake layer, pudding layer, and topping.
For the Nilla Wafer Crust:
- 2 cups Nilla wafer crumbs (about 60 cookies)
- 6 tablespoons unsalted butter, melted
- 2 tablespoons granulated sugar
- Pinch of salt
For the Cheesecake Layer:
- 3 (8 oz) blocks cream cheese, softened
- 1 cup granulated sugar
- 3 large eggs
- 1 teaspoon vanilla extract
- 2 ripe bananas, mashed
- 1/4 cup sour cream
- 2 tablespoons all-purpose flour
For the Pudding Layer:
- 1 (3.4 oz) box instant vanilla pudding mix
- 1 1/2 cups cold milk
- 1 banana, thinly sliced (optional for layering)
For the Crunch Topping & Garnish:
- 1 cup crushed Nilla wafers
- 2 tablespoons melted butter
- 1/2 teaspoon cinnamon (optional)
- Whipped cream (for topping)
- Banana slices or Nilla wafers (for decoration)
Optional: A drizzle of caramel or white chocolate for added decadence.
Preparation
This recipe involves baking the cheesecake layer, chilling it, then assembling the pudding topping and crunch. Follow these steps carefully:
Step 1: Make the Crust
Preheat your oven to 325°F (160°C). Grease a 9-inch springform pan and line the bottom with parchment paper.
In a bowl, mix the crushed Nilla wafers with melted butter, sugar, and a pinch of salt until it resembles wet sand. Press the mixture firmly into the bottom of the pan and slightly up the sides. Use the back of a measuring cup for even pressing.
Bake for 10 minutes, then set aside to cool.
Step 2: Make the Cheesecake Filling
In a large mixing bowl, beat the softened cream cheese until smooth and creamy. Add sugar and mix until combined. Beat in the eggs, one at a time, then add mashed bananas, vanilla extract, sour cream, and flour. Mix until just combined—do not overbeat.
Pour the cheesecake batter over the cooled crust and smooth the top.
Step 3: Bake the Cheesecake
Place the springform pan in a larger roasting pan. Fill the outer pan with hot water (about halfway up the springform pan) to create a water bath. This helps prevent cracking.
Bake for 55–65 minutes or until the center is set but slightly jiggly. Turn off the oven, crack the door open, and let the cheesecake cool inside for 1 hour. Then transfer to the refrigerator to chill for at least 4 hours, preferably overnight.
Step 4: Make the Pudding Layer
In a mixing bowl, whisk together the instant vanilla pudding mix and cold milk. Let it sit for 5 minutes to thicken. Spread a thin layer of pudding over the chilled cheesecake. If you like, place banana slices between the pudding and cheesecake layers for added banana flavor.
Return the cheesecake to the fridge while preparing the topping.
Step 5: Make the Crunch Topping
In a small bowl, mix crushed Nilla wafers with melted butter and cinnamon. Toast in a skillet over medium heat for 3–4 minutes until lightly golden and fragrant. Let it cool completely.
Sprinkle generously over the pudding layer. Top with swirls of whipped cream, more banana slices, and extra cookies for garnish.
FAQ
Can I use homemade pudding instead of instant?
Yes, you can use homemade vanilla pudding, but be sure to let it cool completely before spreading it over the cheesecake.
Do I have to use a water bath for baking the cheesecake?
A water bath helps ensure the cheesecake bakes evenly and prevents cracking. However, if you skip it, just bake at a lower temperature and avoid opening the oven door too often.
How long does this cheesecake keep?
It keeps well in the fridge for up to 4–5 days. Store it tightly covered. The banana slices may brown over time, so add those fresh just before serving.
Can I freeze Banana Pudding Crunch Cheesecake?
You can freeze the cheesecake layer before adding the pudding and topping. Wrap tightly and freeze for up to 2 months. Thaw overnight in the fridge, then add pudding and topping fresh.
Can I use graham crackers instead of Nilla wafers?
Yes, graham crackers work too, but you’ll lose the nostalgic banana pudding taste that Nilla wafers offer. They are strongly recommended for authenticity.
Can I make this recipe without bananas?
Technically yes, but then it won’t be banana pudding cheesecake! If you just want a vanilla pudding crunch cheesecake, you can skip the mashed banana in the filling and banana slices in the topping.
Conclusion
Banana Pudding Crunch Cheesecake is a dessert that delivers everything you could want: nostalgic flavor, creamy texture, and a satisfying crunch in every bite. Whether you’re a die-hard banana pudding fan or a cheesecake connoisseur, this dessert will hit the sweet spot.
It’s ideal for birthdays, family gatherings, BBQs, or whenever you’re looking to impress with minimal stress. You can prepare most of it ahead of time, and it travels well, making it perfect for potlucks and holidays. Best of all, it’s customizable—add caramel, chocolate, or cinnamon as you see fit.
So the next time you’re craving something indulgent and crowd-pleasing, skip the store-bought pie and whip up this layered masterpiece. The creamy banana filling, velvety cheesecake, and crunchy Nilla wafer topping make this a show-stopping treat you’ll want to make again and again.
Let your fork dive into all those layers and experience the perfect blend of creamy, crunchy, sweet, and nostalgic.